 |
 |
INFO:
Setting up a "Remote Desktop Support Session"
Posted: November 13,
2003
Modified: July 18, 2004
DESCRIPTION
This page contains
information on how to set up a "Remote Desktop Support Session"
with our staff, so that we can help you with troubleshooting. It will
allow us to see your desktop, and interact with your computer while you
watch.
Before requesting
a remote desktop session, please be sure that you can recreate and demonstrate
the problem you are having.
This document assumes
you will be using a software package called UltraVNC to provide the session.
It works on all versions of Windows, and is quick and easy to set up.
We will be using the software in a "dial-out" mode, meaning
that you will initiate the support session. In addition to avoiding firewall
issues, this mode will prevent people from "dialing-in" and
interacting with your computer.
Note the software
is based on a project started by AT&T, but is now open-source. You
can download and install it for free.
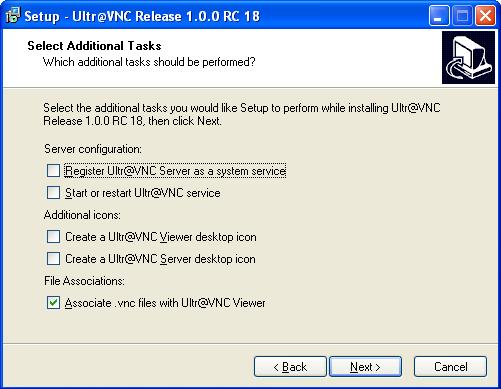
A. OBTAIN
AND INSTALL VNC
- Download and run the UltraVNC setup program: UltraVNC-100-RC18-Setup.exe.
- We recommend you use the settings pictured below during the relevant
installation step, although it is not required that you do.
- Once setup is
complete, start the program by clicking Start
| Programs
| UltraVNC
| Run
Ultr@VNC SERVER.
- Right-click the
VNC
 icon, and choose Properties.
- In the "WinVNC:
Current User Properties" window (partially seen below), type in
something in the password field and then uncheck Accept Socket
Connections. This step ensures that you must initiate a web
session, and other people are prevented from "dialing in"
to your computer. Press Ok.

B. INITIATING
THE SUPPORT SESSION
- If you cannot already
see the VNC
icon in the system tray, start the program by clicking Start
| Programs
| UltraVNC
| Run
Ultr@VNC SERVER.
- Right-click the VNC
 icon that shows up in your system tray, and select Add New Client.
- You will see a window like the one below. Type in the "host name"
given to you by your support representative.
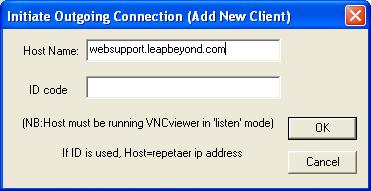
- Ensure the representative
is ready for your "call", and then press OK.
|
 |

